Your Guide to a Mini Resin Printer for Creators
Discover how a mini resin printer can transform your prototypes. This guide covers the technology, workflow, costs, and benefits for crowdfunding creators.
Discover how a mini resin printer can transform your prototypes. This guide covers the technology, workflow, costs, and benefits for crowdfunding creators.
What if you could hold a perfect, high-detail prototype of your Kickstarter product tomorrow? Not a pricey, outsourced model you waited weeks for, but one you printed overnight on your own desk for just a few dollars. That’s not science fiction—it’s what a mini resin printer makes possible. For creators, this little machine is a huge strategic advantage, swapping long, expensive development cycles for rapid, in-house innovation.
Think of a mini resin printer as more than just a piece of hardware; it’s an accelerator for your entire crowdfunding campaign. It gives you the power to physically hold and test your ideas almost as fast as you can dream them up. This completely changes your workflow, letting you iterate on a product daily instead of weekly.

For a Kickstarter creator, the impact is immediate. Instead of just showing backers digital renders, you can use stunning photos of a real, physical product to make your campaign far more convincing. The cost savings are just as impressive. A highly detailed prototype might only set you back a few dollars in resin, a tiny fraction of the hundreds you'd spend to have it made elsewhere.
But the benefits don't stop at prototyping. A mini resin printer also opens the door to handling your own small-batch fulfillment. This means you can easily offer unique, limited-edition rewards or custom variations that would be a logistical nightmare to arrange with a third-party manufacturer. Having that kind of production power on your desktop gives you incredible flexibility. If you're just getting started, our guide on crafting your crowdfunding prototype is a great resource.
Of course, managing all these custom orders and fulfillment details requires the right backend system. The Kickstarter pledge manager is like Amazon—functional for basic transactions but limited in customization. A dedicated pledge manager, on the other hand, gives you far more control.
A great way to think about it is to compare the Kickstarter pledge manager to Amazon and a platform like PledgeBox to Shopify. The PledgeBox pledge manager is like Shopify because it gives you the tools to build your own robust post-campaign "store" with custom surveys, add-ons, and detailed order management.
This level of control is non-negotiable when you're managing complex rewards, custom add-ons, and shipping logistics for items you've printed yourself.
One of the best parts of this whole setup is how accessible it is financially. For example, PledgeBox is free to send the backer survey and only charges 3% of upsell if there's any.
This model makes it a true partner in your success, allowing you to maximize your campaign's potential without big upfront costs. When you pair the rapid prototyping of a mini resin printer with a powerful pledge manager, you create a system that lets you perfect your product, wow your backers, and deliver on your promises without a hitch.
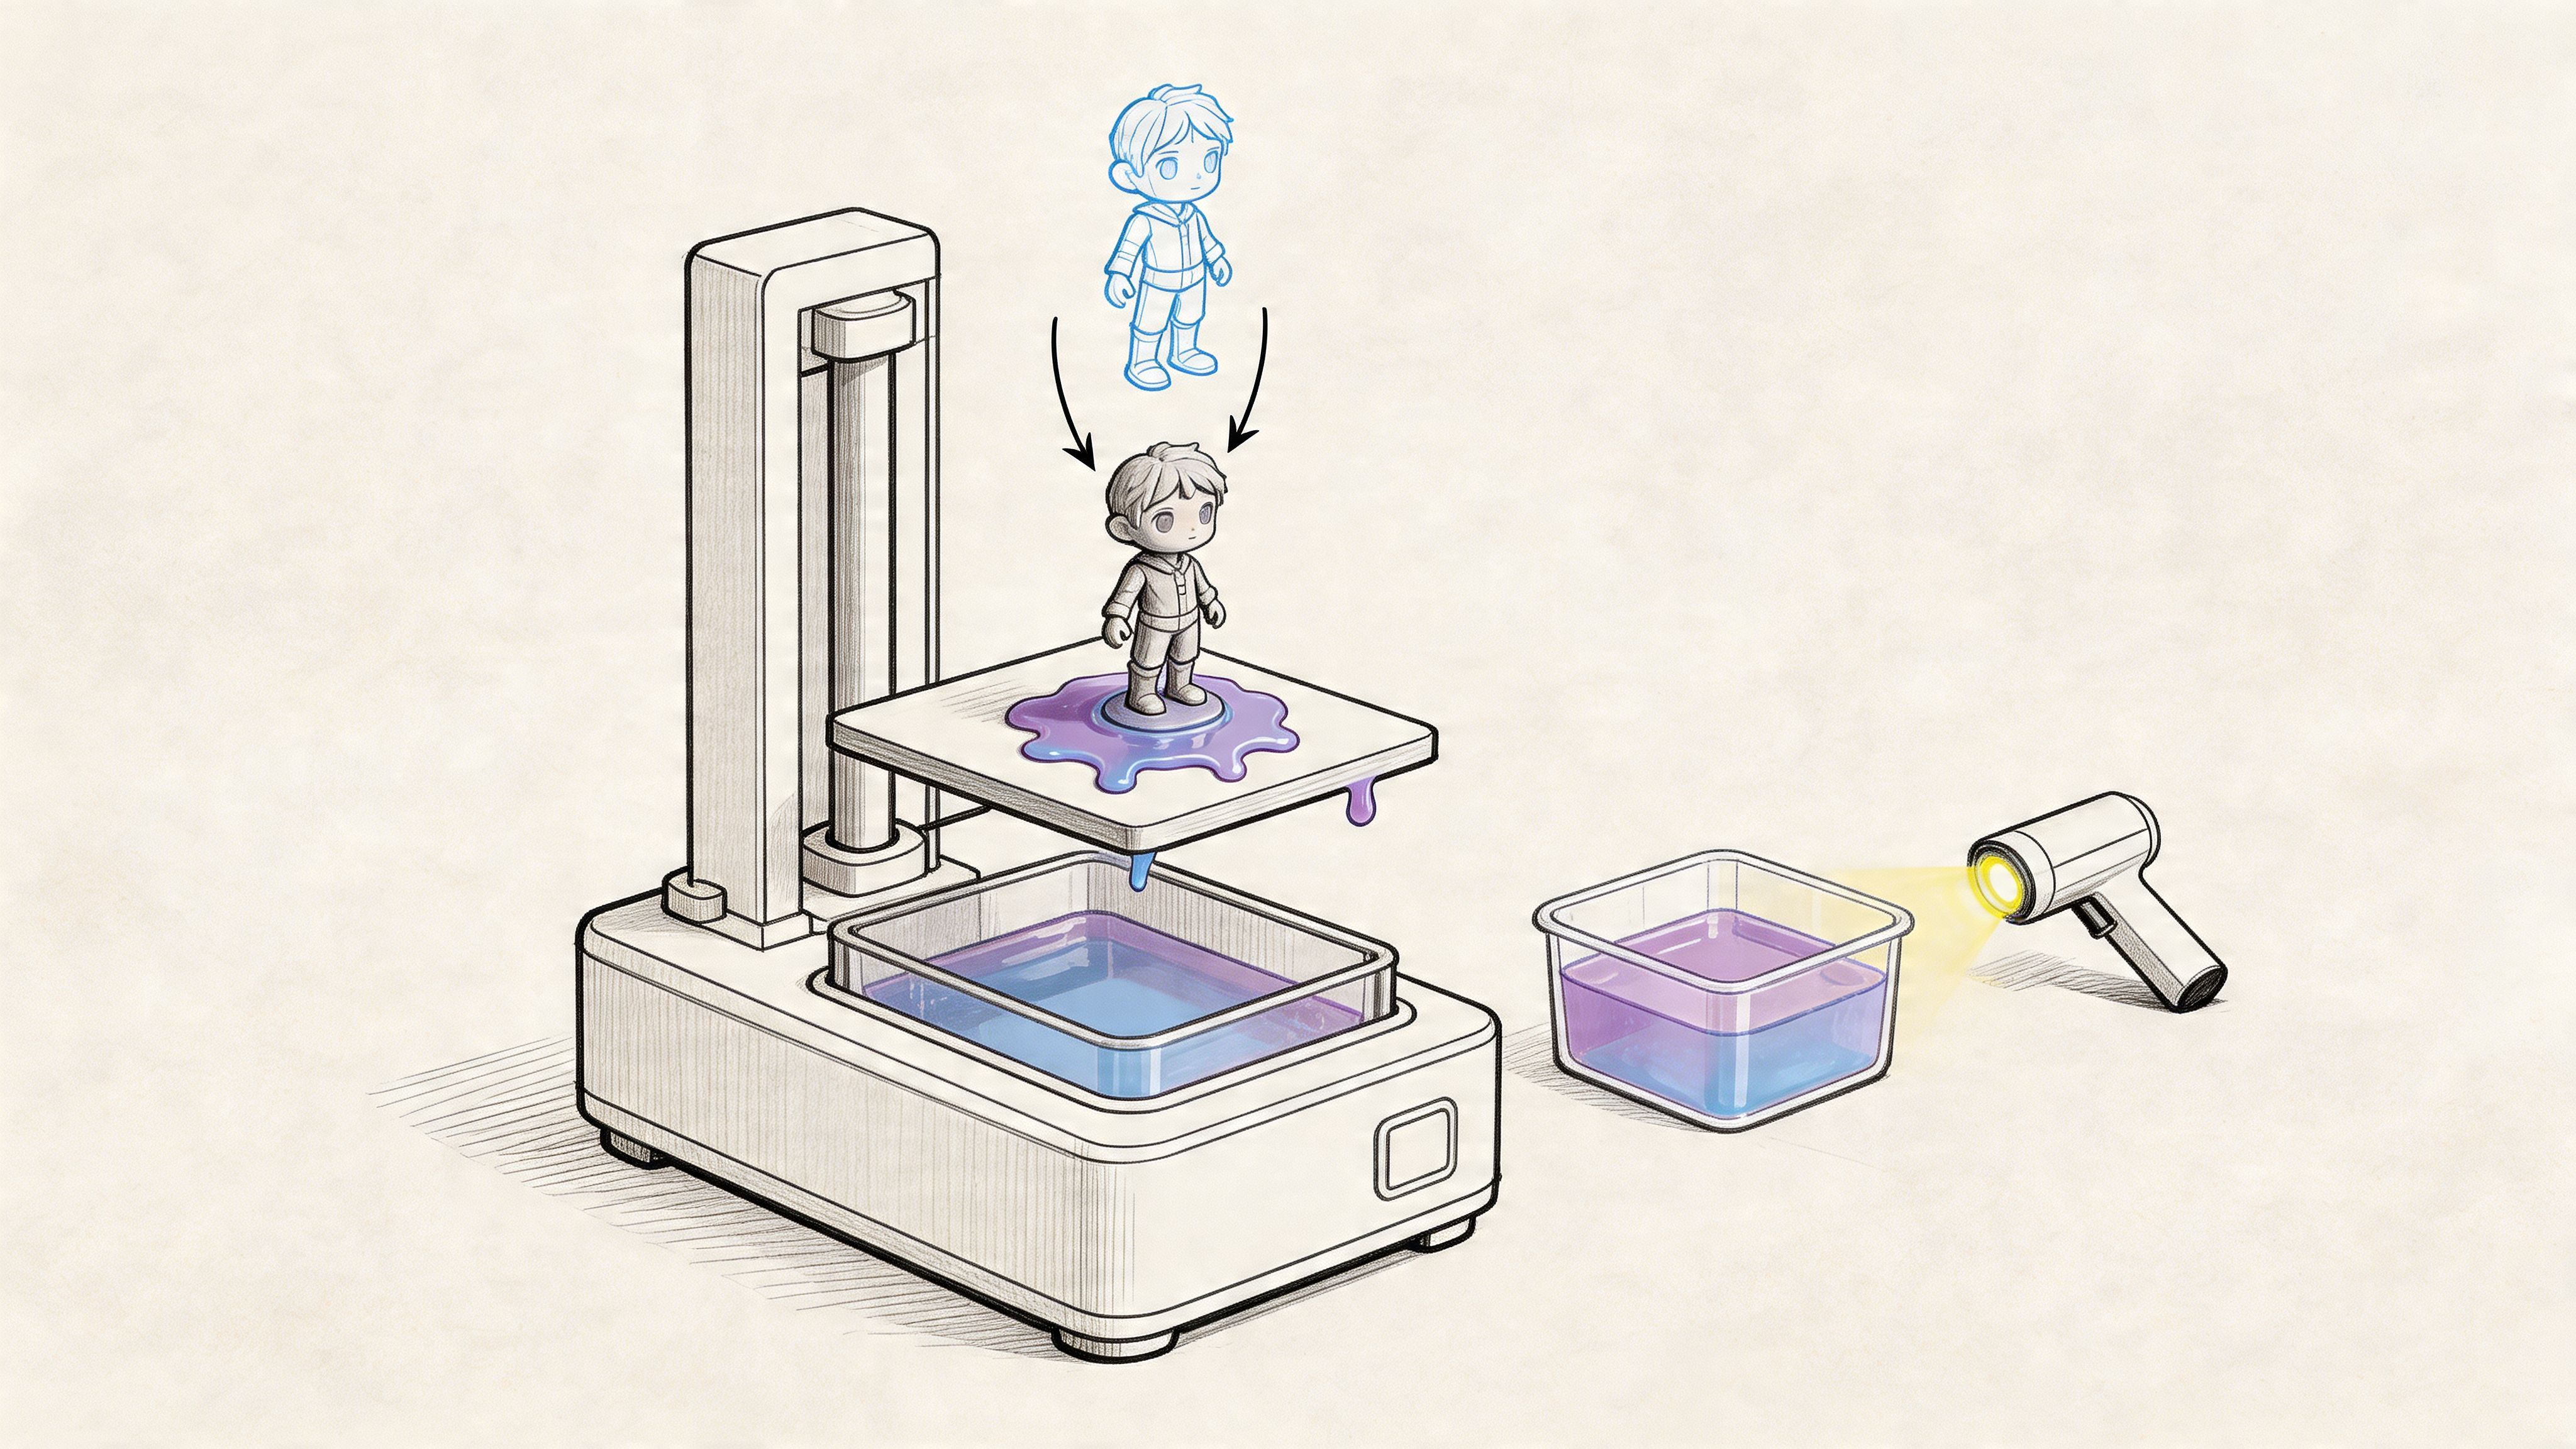
Watching a mini resin printer at work feels a bit like magic. A pool of liquid slowly gives way to a solid, incredibly detailed object. This isn't magic, though—it's a fascinating blend of light and chemistry, driven by a technology called Masked Stereolithography (MSLA). It's this very process that has made desktop resin printing both affordable and amazingly precise.
Think of it like building a sculpture from liquid that hardens the instant a special light hits it. That's exactly what a mini resin printer does, just on a microscopic level. It constructs your object from the bottom up, one razor-thin layer at a time.

The entire process relies on a few key parts working together in perfect harmony. Each component has a critical job in this layer-by-layer creation.
You can think of the printer as a small, automated factory. Its main "workers" are the light source, a screen, a build platform, and a vat of special liquid resin.
This cycle repeats hundreds or even thousands of times. With each layer, the build plate slowly rises out of the vat, pulling the newly formed solid object with it.
This technology didn't just appear out of nowhere. The roots of modern mini resin printers go back to Dr. Hideo Kodama's 1980 invention of using UV light to cure photosensitive resin, which laid the groundwork for stereolithography (SLA). The first commercial machines in the 1980s were huge and cost hundreds of thousands of dollars.
It wasn't until the late 2010s that brands like Anycubic and Elegoo figured out how to use MSLA to create desktop-sized printers for as little as $200. This breakthrough put high-detail printing directly into the hands of hobbyists and Kickstarter creators.
Of course, the printer is only half the equation. To get the most out of your machine, you need to understand the different liquid resins available. A good professional 3D printing materials guide can be an invaluable resource here. The material you pick will directly affect your model's final strength, flexibility, and detail.
So you’ve got a digital design and a mini resin printer. How do you actually turn that file on your computer into a physical object you can hold? While the tech might seem intimidating at first, the workflow is surprisingly straightforward once you get the hang of it.
It all boils down to a three-part process: getting your file ready (Pre-Processing), the actual printing, and finally, cleaning it up (Post-Processing). Let’s walk through each stage so you have a clear roadmap from digital idea to tangible prototype.
This first stage is all about software. Before your printer can do anything, you need to prepare your 3D model (usually an STL or OBJ file) using a special program called a slicer. Think of a slicer as the digital translator between your design and the printer. It takes your 3D shape and cuts it into hundreds, sometimes thousands, of super-thin horizontal layers.
Here are your main jobs inside the slicer software:
Once you’re happy with the setup, the slicer will export a new file that your printer can understand. And a quick word of advice for creators: make sure you actually have the rights to print and sell your designs. Our guide on using 3D print files for commercial use is a great resource for navigating this.
With your sliced file on a USB stick, it’s time for the hands-on part. This is where you need to be careful and methodical.
First things first: safety is non-negotiable. Liquid resin is a skin irritant, so always wear nitrile gloves and safety glasses when you handle it. You’ll also want to work in a well-ventilated space to avoid breathing in the fumes.
Getting the printer ready is simple:
The machine takes it from there, methodically lowering the build plate and using UV light to cure one layer at a time. Depending on the size and detail of your model, this can take anywhere from two to twelve hours.
When the printer beeps, you’re not done yet. You’ll have a finished-looking model, but it’s dripping with uncured resin and is still quite soft. Post-processing is the critical final step to clean, strengthen, and finish the part.
This final stage is just as important as the printing itself. Skipping or rushing these steps will result in a sticky, brittle, and unusable object. A proper post-processing workflow is essential for achieving the professional quality that will impress your backers.
This workflow breaks down into three key actions:
By following this three-phase process every time, you’ll be able to consistently turn your digital files into high-quality prototypes ready for their close-up.
Jumping into resin printing for the first time can feel like a lot, especially with all the tech jargon and marketing noise. Let's cut through that. This guide will help you pick the right mini resin printer for your crowdfunding project, focusing on what actually matters for turning your digital ideas into incredible physical prototypes.

The image above gives you a bird's-eye view of the entire process: taking a digital file, printing it, and finishing the physical part. Getting a feel for these three stages—slicing your file, the actual printing, and post-processing—is the first step. It helps you see how a printer's specs directly affect the quality of your prototypes and how fast you can make them.
When you start comparing printers, you'll see the same numbers and terms over and over. Instead of getting bogged down in a spec sheet, let's talk about what these numbers mean for your real-world results.
This is the big one for detail. Think of the printer's LCD screen as a high-tech stencil. The smaller the pixels in that stencil, the finer the details it can create.
XY Resolution: This is measured in micrometers (µm) and tells you the smallest feature you can print on a flat surface. A lower number here is better. A printer with 22µm resolution will produce much sharper edges and textures than one with 50µm. If you're making things like miniatures, jewelry, or intricate product components, better XY resolution should be your top priority.
Layer Height: This is how thick each individual vertical layer is, also measured in µm. While you can adjust this in your software, the printer's own stability dictates the thinnest reliable layer you can print. Thinner layers (like 25µm) give you incredibly smooth surfaces with almost no visible lines, but they also make your print times much longer.
This spec simply tells you the biggest object you can print, usually listed as L x W x H (e.g., 128 x 78 x 160 mm). For a mini resin printer, the build volume is compact by design.
Take a second to think about the actual size of your prototypes. If your product is small, a standard mini printer will be a perfect fit. If you have a larger design, you can either split your model into smaller parts to be assembled later or start looking at a slightly larger, mid-sized machine.
Measured in millimeters per hour (mm/hr), this is all about how fast your model grows vertically. Higher speeds are fantastic for rapid prototyping, letting you test out several different design tweaks in a single day.
Just know that speed is almost always a trade-off with quality. Pushing the printer too fast can sometimes lead to failed prints or slightly softer details. Modern printers with monochrome screens and better vat films (like nFEP) have made huge leaps here, offering much faster and more reliable speeds than older models.
Of course, buying your own mini resin printer isn't the only way to get a prototype made. It helps to understand the alternatives so you can see where your money really provides the most value. For a crowdfunding creator, the decision usually boils down to a balance of speed, cost, and control.
Here’s a quick look at how owning a mini resin printer stacks up against outsourcing to a service bureau or using a more common FDM (filament) printer.
| Factor | Mini Resin Printer | 3D Printing Service Bureau | FDM 3D Printer |
|---|---|---|---|
| Upfront Cost | Low to Medium ($200 - $600) | None | Low to Medium ($200 - $800) |
| Cost Per Part | Very Low (often < $5) | High (can be $50 - $300+) | Very Low (often < $3) |
| Turnaround Time | Very Fast (hours) | Slow (days to weeks) | Fast (hours) |
| Detail & Quality | Very High | Very High | Low to Medium |
| Ease of Iteration | Excellent | Poor (slow & expensive) | Good |
| Material Choice | Good (various resins) | Excellent (industrial plastics, metals) | Excellent (various filaments) |
As you can see, a personal mini resin printer really hits the sweet spot for creators. You get the ultra-high detail of a professional service for a tiny fraction of the per-part cost, all while having the speed to iterate on your design as many times as you need before your campaign goes live.
The printer is just one piece of the equation. For a frustration-free experience, especially when you're just starting out, the ecosystem around the printer—software, materials, and community—is just as important.
Slicer Software: Is the manufacturer's own software intuitive, or a nightmare to use? Does it have helpful features like auto-supports? Many experienced users prefer powerful third-party slicers like Lychee or ChiTuBox, so check if the printer you’re eyeing is compatible with them.
Resin Compatibility: An open system is a huge plus. While most printers work with third-party resins, some brands try to lock you into their own expensive materials. Having the freedom to experiment gives you a better chance of finding the perfect resin for your project's needs and budget.
Community and Support: Never underestimate the power of a good community. A big, active user base on platforms like Reddit or Facebook can be a lifesaver when you run into an issue. It saves you hours of guesswork. On top of that, solid customer support directly from the manufacturer is a major bonus.
When you bring a mini resin printer in-house, it stops being just a tool and becomes a core part of your business strategy. For a crowdfunding creator, this isn't just about making things—it's about gaining a serious competitive edge. Let's look at two powerful ways to weave this capability into your campaign: for rapid prototyping and for small-batch fulfillment.
These strategies let you build a better product and offer more compelling rewards to your backers. But with these new powers comes new responsibility. To keep everything running smoothly, you absolutely need a solid backend system, which is where a dedicated pledge manager becomes a creator's best friend.
The most immediate win from having an in-house resin printer is perfecting your product before you even hit "launch." Imagine printing a new version of your design every single day. You can fine-tune the ergonomics, test the fit, and nail the finish. This rapid cycle, which would normally cost thousands and take weeks with an outside service, can now happen overnight on your desk for just a few dollars in resin.
This incredible speed means you can validate your design fast. You can hold it, test it, and make sure every piece fits and functions exactly as you promised. It's a huge step in de-risking your entire project, giving you—and your backers—confidence that you can deliver.
Better yet, these high-detail prototypes are pure marketing gold. Professional photos of a real, physical product are infinitely more convincing than a 3D render. You can shoot amazing photos and videos showing your product in the wild, building trust and excitement with backers long before the campaign even begins.
Once the campaign funds, your printer shifts from a prototyping tool to a micro-factory. This unlocks a whole new world of offering unique, limited-edition rewards that would be a logistical nightmare to coordinate with a large-scale manufacturer.
Think about what you could offer your backers:
This kind of in-house production gives you unbelievable flexibility. You can produce these special items on-demand after the campaign wraps, which means less upfront cash and zero inventory risk. It’s a brilliant way to make your backers feel truly special and boost the value of their pledge.
For creators wanting to not just produce but also sell their designs, it's smart to think about modern sales channels. You could even explore how to build an AI shopping agent to help automate and manage sales, especially when you're juggling crowdfunding fulfillment.
Whether you're offering a dozen custom rewards or just shipping a standard product, managing everything after the campaign is where many projects stumble. You have to collect addresses, track add-ons, and coordinate shipping—it’s a lot. This is where having the right tool is non-negotiable.
Think of the Kickstarter pledge manager like Amazon—it's standardized and gets the job done for simple checkouts. A dedicated pledge manager like PledgeBox, on the other hand, is like getting your own personal Shopify store. The PledgeBox pledge manager gives you a powerful and customizable platform to run your entire post-campaign show.
With a dedicated pledge manager, you gain the control needed to handle complex orders, offer upsells, and communicate effectively with your backers. This isn't just an administrative tool; it's a revenue and relationship-building engine for your project.
This level of control is absolutely essential when you're dealing with custom rewards from your mini resin printer. You can build detailed surveys to let backers pick their options, calculate precise shipping costs, and seamlessly process payments for any extras they want to add.
To learn more about this synergy, you can see how 3D printing and Kickstarter work together to bring incredible ideas to life.
Best of all, a platform like PledgeBox is free to send the backer survey and only charges 3% of upsell if there's any. This model means there’s no upfront risk, giving you access to a full suite of professional tools to make your campaign a massive success and give your backers an experience they'll love.
You’ve seen those jaw-droppingly detailed models and miniatures, and now you’re wondering if a mini resin printer is right for you. It's a powerful tool, but it's natural to have questions about safety, cost, and how it all works.
Let's clear up some of the most common questions creators have before they take the plunge. We’ll give you the straightforward answers you need to start printing with confidence.
Yes, resin printing is perfectly safe, as long as you treat the materials with respect. Safety is non-negotiable. The liquid photopolymer resins can irritate your skin and respiratory system, and they give off fumes known as volatile organic compounds (VOCs).
But managing this is simple. Just follow a few key precautions:
The great news? Once a print is properly washed and fully cured under UV light, it becomes a solid, inert piece of plastic that is generally safe to handle. Always glance at the Safety Data Sheet (SDS) from your resin maker for specific instructions.
The price of the printer itself is just the starting point. Your main ongoing cost will be the liquid resin.
Here’s a realistic look at the expenses:
Even though the cost-per-print is incredibly low compared to ordering from a service, you need to budget for these recurring costs, especially if you plan on producing rewards for your campaign.
Choosing between a resin (MSLA) and a filament (FDM) printer boils down to one simple trade-off: detail versus strength and size.
Think of it this way: a resin printer is like a fine-art paintbrush, perfect for creating intricate details and smooth surfaces. An FDM printer is more like a broad-stroke house painter's brush—strong, fast for large areas, but not suited for delicate work.
A mini resin printer is the undisputed champion of fine detail. It creates incredibly smooth surfaces that are perfect for:
Filament printers, on the other hand, melt and extrude spools of plastic. They’re fantastic for making larger, stronger, and more functional parts. Think structural components, mechanical brackets, or big mockups where a perfect surface finish isn't the priority.
For a crowdfunding creator aiming to wow backers with a visually stunning prototype, a mini resin printer is almost always the right tool for the job.
Getting those perfect, consistent results from a mini resin printer just takes a little routine upkeep. These tasks are quick and easy, but skipping them is the fast track to frustrating print failures.
Your main maintenance checklist is pretty simple:
Staying on top of this simple routine is the best thing you can do to keep your printer running smoothly and delivering perfect models for years to come.
Managing a crowdfunding campaign's fulfillment, especially with custom 3D printed rewards, requires a powerful and flexible system. PledgeBox provides an all-in-one toolkit to streamline your post-campaign operations, from collecting backer surveys to managing upsells and shipping. It's free to start, with a simple 3% fee only on funds you raise through add-ons, making it a risk-free partner for your success. Learn more and get started today at PledgeBox.
The All-in-One Toolkit to Launch, Manage & Scale Your Kickstarter / Indiegogo Campaign