Your Guide to a Successful 3D Printing Kickstarter
Launch a successful 3D printing Kickstarter with our guide. Learn pre-launch strategy, campaign management, fulfillment, and post-campaign upselling.
Launch a successful 3D printing Kickstarter with our guide. Learn pre-launch strategy, campaign management, fulfillment, and post-campaign upselling.
Launching a 3D printing Kickstarter takes more than just a cool design. It demands a rock-solid plan that covers everything from your first prototype to the moment your product lands on a backer's doorstep. This guide is your roadmap, helping you sidestep the common traps in one of Kickstarter's hottest categories, like miscalculating costs or dropping the ball on logistics after the campaign ends.
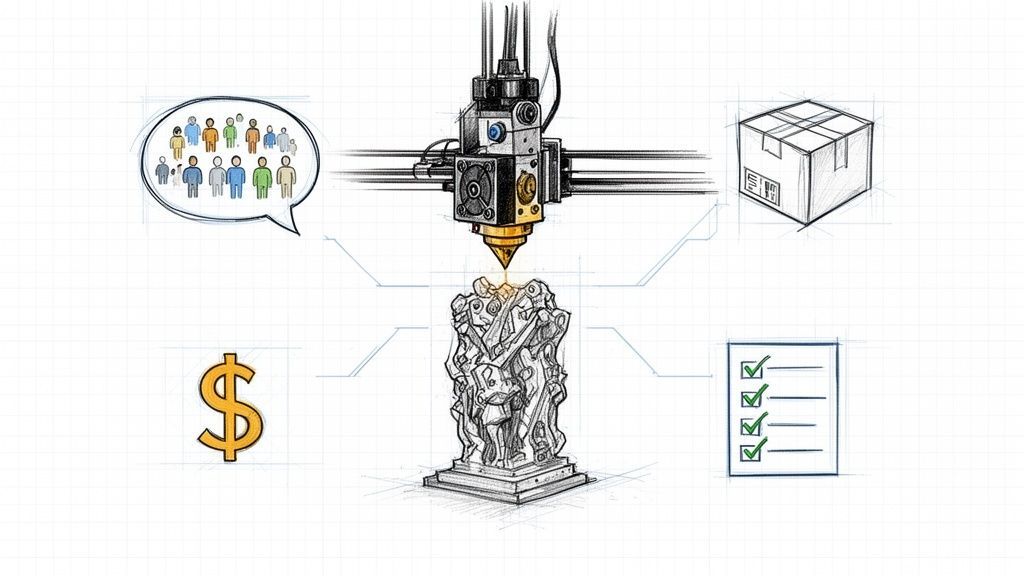
To bring a 3D printing project to life on Kickstarter, you've got to nail a few key things: a proven prototype, a story that grabs people, smart pricing, and—this is the big one—a bulletproof fulfillment strategy. Too many creators get so wrapped up in the campaign itself that they forget about what comes next. That's a surefire way to derail a project, no matter how much money you raise.
Before you even think about launching, you need to understand the modern crowdfunding workflow. Building an audience ahead of time is non-negotiable. It's about having a practical strategy for lead generation that gives you that critical day-one momentum.
To help visualize the entire process, let's break it down into its core phases and what you should be focused on at each stage.
This table summarizes the essential stages and key objectives for creators to focus on throughout their crowdfunding journey.
| Campaign Phase | Primary Objective | Key Activities |
|---|---|---|
| Pre-Launch | Build an engaged audience and validate the product concept. | Prototyping, cost analysis, landing page creation, email list building, social media teasing. |
| Live Campaign | Achieve funding goal and build community momentum. | Daily updates, backer engagement, media outreach, managing stretch goals, answering comments. |
| Post-Campaign | Collect backer data, manage funds, and prepare for production. | Sending surveys, collecting shipping/VAT, upselling add-ons, finalizing manufacturing plans. |
| Fulfillment | Manufacture and ship rewards accurately and on time. | Production oversight, quality control, packaging, coordinating with shipping carriers, providing tracking info. |
As you can see, the live campaign is just one piece of a much larger puzzle. The real work often begins after the funding clock stops.
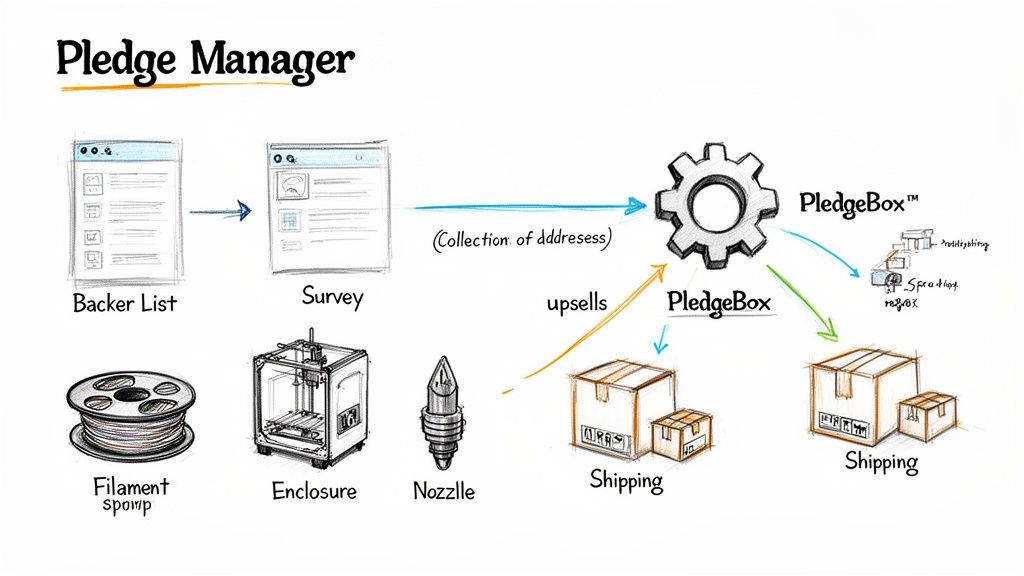
Here’s a simple way to think about it: Kickstarter is your storefront. It’s where people discover your project and make their initial pledge, kind of like browsing on Amazon. But for everything that happens after the pledge—collecting shipping addresses, sorting out taxes, and offering extra goodies—you need a dedicated backend.
That’s where a pledge manager comes in. Think of PledgeBox as the Shopify for your campaign. It gives you total control over the post-campaign chaos. You can send out detailed backer surveys, charge the right shipping fees for every single backer, and offer high-margin add-ons. This is how you turn a one-off project into a real business.
Here's the best part: using PledgeBox to send your backer survey is completely free. They only take a small 3% fee on any extra money you raise from upsells. It’s a no-risk way to professionalize your fulfillment without any upfront cost.
This simple diagram shows how the process flows from Kickstarter to a scalable business with the right tools in place.
This workflow shows the handoff from the public-facing campaign to a controlled backend operation designed to boost revenue and keep backers happy. The key takeaway? The initial funding is just the beginning. Real success is all about what you do next.
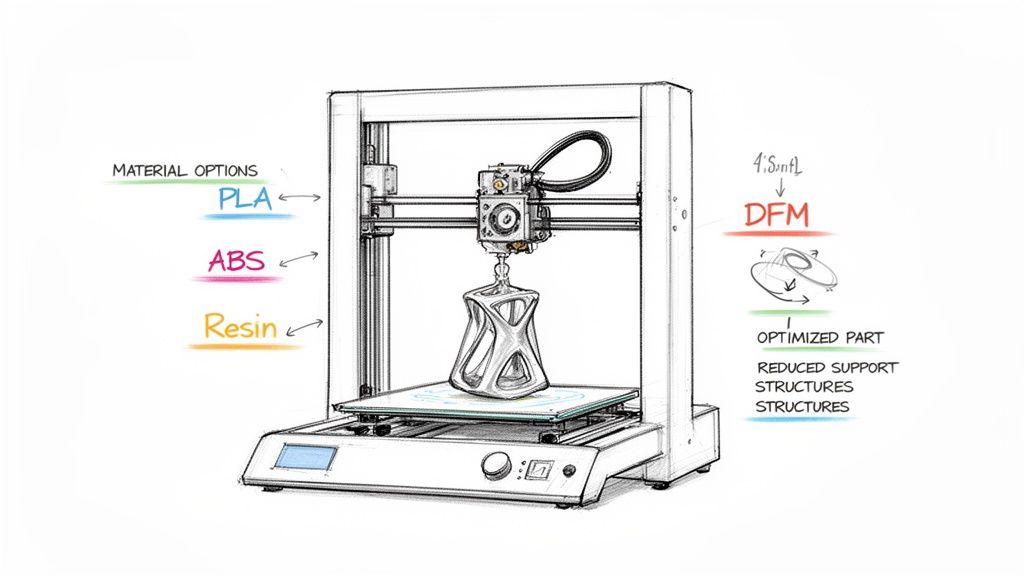
Let's be blunt: a cool idea for a 3D printing project won't get you funded. Backers won't open their wallets for a concept alone. The real bridge between your vision and a successful Kickstarter is a production-ready prototype.
This isn’t just some cobbled-together proof-of-concept. We're talking about a refined, tested, and actually manufacturable version of your final product. Kickstarter backers, especially in the hardware space, are incredibly savvy. They can sniff out a project that’s still just an idea on a napkin from a mile away.
A solid prototype does two critical things. First, it proves your design actually works and helps you find fatal flaws before you're locked into a manufacturing plan. Second, it becomes the star of your campaign—the tangible proof in your videos and photos that you can actually deliver. Skipping this step is a massive gamble, and frankly, it's where most failed projects go wrong.
The material you pick for your prototype will define its function, feel, and durability. This choice is so much more than just aesthetics; it’s about matching the physical properties to how your product will be used in the real world.
For a deeper dive into this crucial first step, our complete guide on how to craft a crowdfunding prototype offers detailed strategies to bring your idea into the physical world.
A model that looks amazing on your screen can quickly turn into a production nightmare. This is where Design for Manufacturability (DFM) saves the day. DFM is simply the art of designing your parts to be made as efficiently and reliably as possible. For a 3D printing Kickstarter, that means optimizing your models to cut down print times, slash material waste, and reduce the chance of failed prints.
A core DFM principle is to design away the need for support structures. By orienting your model smartly or designing with overhangs of less than 45 degrees, you can eliminate hours of post-processing and save a shocking amount of material when you're printing hundreds or thousands of units.
Simple tweaks can make a world of difference. Thickening up thin walls, adding fillets to sharp corners to spread out stress, or even splitting a complex model into smaller, easy-to-print pieces will dramatically improve your production workflow. Applying DFM from the start ensures you’re not just making a product, but a product that can be reliably manufactured on time and on budget.
One of the biggest forks in the road you'll face is deciding how to produce your rewards. Do you use on-demand 3D printing services, or do you bite the bullet and invest in your own printers and tooling?
| Factor | On-Demand 3D Printing | In-House Tooling & Printing |
|---|---|---|
| Upfront Cost | Low to none. You pay per part. | High. Requires investment in printers, materials, and space. |
| Scalability | Excellent for low to medium volume. | Best for high volume and long-term production. |
| Flexibility | Easy to make design changes between batches. | Changes can be costly and time-consuming once tooling is set. |
| Control | Less control over quality and timelines. | Full control over the entire production process. |
The right call here depends entirely on your campaign's scale. If you have a modest funding goal and only expect to ship a few hundred units, on-demand services are a fantastic, low-risk way to get started. But if you’re planning for thousands of backers and see this product as a long-term business, investing in your own tooling is a much smarter and more cost-effective move.
Let’s be honest. A killer campaign page and an engaged community are the two engines that will make or break your 3D printing Kickstarter. You could have the most incredible 3D printer design in the world, but if nobody knows about it before you click "launch," you're likely to hear crickets. Success isn’t just about the product—it’s about building a tribe of eager backers who are genuinely excited to support you on day one.
This whole process really gets going months before your campaign ever sees the light of day. Your first mission is to grab the attention of your ideal backer. It all starts with a simple but powerful landing page dedicated to your upcoming project. Its one and only job? To collect a visitor's email address.
This pre-launch email list is pure gold. It's your direct line to the people who are most fired up about what you're creating. To get that early interest snowballing and build a solid list of subscribers, it’s worth looking into dedicated waitlist software tools designed for this pre-launch phase.
Once your landing page is up and running, it's time to start bringing people to it. This isn't about shouting into the void; it's about strategically finding your people where they already are.
The goal here is to create real connections. You're not just trying to sell a machine; you're inviting people to become part of its origin story. If you want to dig deeper into this crucial phase, check out these seven actions to build your Kickstarter community.
When launch day finally arrives, your Kickstarter page is your digital storefront. It needs to be polished, professional, and persuasive enough to turn a casual browser into a committed backer. A top-notch video is absolutely non-negotiable. It’s your best shot to tell your story, show off your printer's coolest features, and let your passion shine through.
The text on your page should feel more like a story than a technical manual. Kick things off with the problem you're solving, introduce your printer as the hero, and then dive into the nitty-gritty features and specs. Be sure to use high-quality GIFs and images to break up the text and visually demonstrate what makes your product special.
It's this blend of storytelling and visual evidence that really builds trust and excitement.
Your reward tiers are the heart of your campaign's financial engine. They have to be crystal clear, super compelling, and create a little bit of FOMO.
A tried-and-true tactic is the "Super Early Bird" tier. Offering your 3D printer at a steep discount to the first 50 or 100 backers creates a powerful reason for people to pledge right away. This is how you get that critical day-one funding surge that gives your campaign massive momentum.
Stretch goals are your secret weapon for keeping that momentum going long after you've smashed your initial funding target. Instead of just tacking on generic features, think about value-added partnerships that will get backers genuinely excited.
Take Snapmaker, for example. Their U1 campaign became the most funded 3D printer project in Kickstarter history at the time, raising an incredible $20,161,265. A huge part of their strategy involved a large-scale beta testing program to build pre-launch buzz and smart partnerships with brands like KIRI Engine and Polymaker, which added real, tangible value to their pledges.
When you put your community first, you transform a simple product launch into a massive, collaborative event that backers are absolutely thrilled to be a part of.
Congratulations, your campaign is funded! That intense 30-day sprint is over, and the feeling of hitting your goal is absolutely electric. But this is where the real work on your 3D printing Kickstarter begins. The post-campaign phase is a minefield of logistical headaches, and it's where far too many promising projects start to fall apart.
Successfully raising money is only half the battle. The history of crowdfunding is littered with cautionary tales of projects that smashed their funding goals but failed to deliver. The 3D printing world has seen its share of both massive successes and spectacular flameouts.
A classic example is the Peachy Printer campaign, which raised over $650,000 back in 2013 but never shipped a single printer. It’s a stark reminder that funding doesn't guarantee delivery. You can dive deeper into that story and its lessons on 3D Printing Journal. This just hammers home the point: solid project management and a real fulfillment plan are non-negotiable for keeping backers happy.
Many first-time creators figure Kickstarter's built-in survey system is all they need. And sure, if you're just shipping a t-shirt or an enamel pin, it's probably fine. But for a complex hardware project like a 3D printer, it's dangerously inadequate.
Think of it this way: the native surveys are a one-and-done deal. Once you send them, you can't edit them. More importantly, backers can't easily update their shipping address if they move. For a product with a long manufacturing lead time, that's a recipe for disaster. You could end up shipping thousands of dollars worth of printers to old, wrong addresses.
Beyond that, the basic survey just can't handle the complexities of a global hardware launch. It has no built-in way to:
Relying on this limited tool throws you into a logistical nightmare of spreadsheets, manual calculations, and an inbox flooded with back-and-forth emails. It’s messy, prone to human error, and a surefire way to frustrate your backers.
This is exactly where a dedicated pledge manager becomes your most valuable ally. It acts as your command center for everything that happens after the campaign funds clear, turning the chaos of managing thousands of individual backers into a structured, automated workflow.
Let’s go back to an earlier analogy. If the Kickstarter pledge manager is like Amazon—the massive storefront where you make the initial sale—then a pledge manager like PledgeBox is like Shopify. It's the powerful, flexible backend that gives you total control over your customer relationships and fulfillment.
A common myth is that pledge managers are expensive or complicated. The truth is, PledgeBox is completely free to send your backer surveys. You only pay a small 3% fee on the extra funds you raise from add-on upsells. This means you can professionalize your entire fulfillment process with zero upfront cost.
This risk-free model makes it a no-brainer for any hardware creator. You get a massive operational advantage without cutting into the funds you worked so hard to raise. For a deeper look at the options out there, check out our guide on how to select the right pledge manager for your project's specific needs.
One of the most powerful features of a pledge manager is the ability to offer add-ons and upsells after the campaign. This is your chance to significantly bump up your average pledge value and total revenue, giving you a crucial buffer for any unexpected production costs that pop up.
Imagine you just funded your awesome new 3D printer. Inside your PledgeBox survey, you can set up a curated post-campaign store. Here, you can offer backers high-margin items that perfectly complement their new machine.
Examples of Smart Upsells for a 3D Printer Campaign:
These small additions might seem minor, but they add up fast. It’s not uncommon for creators to increase their total funding by 10-20% with a well-planned upsell strategy. That extra cash can be the difference between breaking even and turning a healthy profit, all while giving your backers more of what they want. By handing these logistics over to a dedicated platform, you free yourself up to focus on what really matters: building a fantastic product and delivering on your promises.
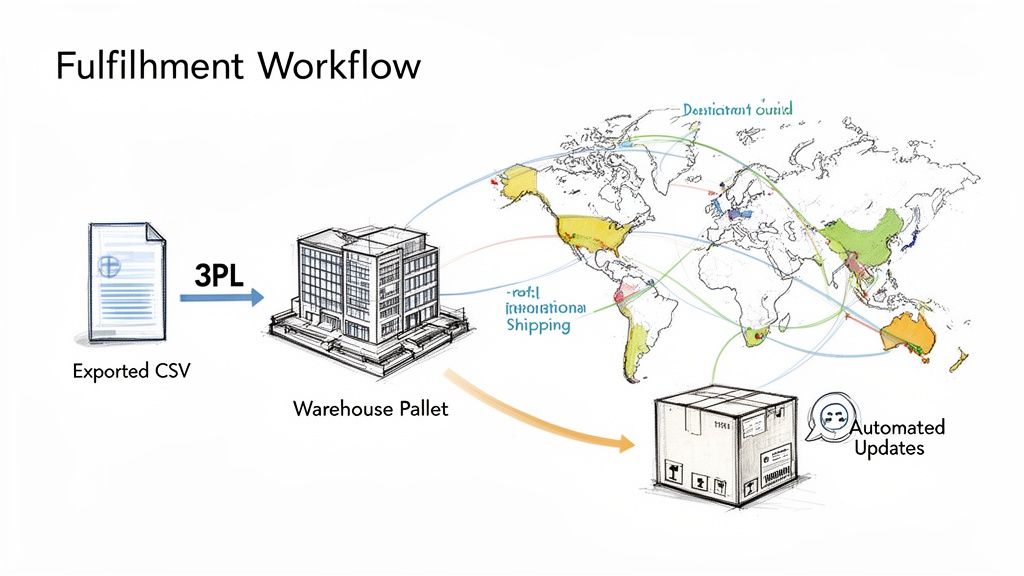
Getting your rewards into backers' hands on time is the ultimate test of your campaign. The celebration of a successful 3D printing Kickstarter quickly pivots to the logistical challenge of fulfillment. This is where all your planning comes together, turning digital pledges into physical products shipped across the globe. A messy workflow here can sink your reputation fast.
It all starts with getting clean, organized backer data. A solid pledge manager is built for this, letting you export detailed CSV files that are ready for your shipping partner. Whether you're using a third-party logistics (3PL) company or packing boxes in your garage, this export is your master list, containing every detail from addresses to individual SKUs.
Shipping a hardware product worldwide adds a whole new layer of headaches. You're not just mailing a box; you're dealing with a tangled web of customs rules, tariffs, and taxes that are different in every single country. One mistake can mean returned packages, upset backers facing surprise fees, and a logistical nightmare you just don't have time for.
To sidestep these issues, you need the right paperwork for every single shipment.
Getting these details right from the start is what separates a smooth delivery from a fulfillment disaster.
During production and shipping, honest and frequent communication is your best friend. You'd be surprised how patient backers can be, as long as they know what's going on. Going silent is the fastest way to kill the trust you’ve worked so hard to build.
Stick to a regular update schedule, even when there's no big news. A quick monthly post with some production photos, an explanation for a small delay, or just a confirmation that things are on track makes a huge difference. It makes backers feel like they're part of the journey, not just customers waiting on an order.
Modern fulfillment tools can handle a lot of this automatically. Once you start shipping, you can integrate your shipping provider with your pledge manager to send out tracking numbers to backers automatically. This one simple step cuts down dramatically on "Where's my package?" emails, letting you focus on bigger things.
Your Kickstarter campaign doesn't have to be a one-and-done deal. Think of it as the launchpad for a real, sustainable business. The community you've built is your first wave of loyal customers, and the momentum from your launch is gold.
This is where a pledge manager really shines. If the Kickstarter pledge manager is your launch platform—like an Amazon product drop—then your pledge manager is your backend e-commerce engine, like Shopify, giving you the tools to keep growing. For example, PledgeBox is completely free to use for sending your backer surveys. They only charge a 3% fee on any extra money you make from upsells, which means you get this powerful growth tool at no upfront cost.
You can use your pledge manager's pre-order store to catch sales from people who missed the campaign. Drive traffic there from social media or your website and keep selling your 3D printer long after the Kickstarter has ended. This creates a steady stream of revenue to fund your next big idea. The demand is clearly there; the EufyMake E1 3D printer raised a staggering $46 million, proving what's possible. You can read more about this incredible campaign and what it means for the industry on Kickstarter Updates.
Launching a successful 3D printing Kickstarter is a massive undertaking, and it's totally normal to have questions pop up. The journey from a brilliant idea to a shipped product has a lot of moving parts. To help you map out your path, here are some of the most common hurdles creators face, with direct answers pulled from real-world experience.
Honestly, the costs can swing wildly depending on your project's complexity and how big you want to go with marketing. That said, there are several core expenses you absolutely cannot skip if you want to run a professional campaign that backers will trust.
Your main costs are going to break down into a few key buckets:
A classic rookie mistake is setting a funding goal that just barely covers manufacturing. This leaves you with zero buffer for platform fees, marketing, or those inevitable surprises. A much smarter move is to build a detailed budget that covers everything, then tack on a 10-15% contingency fund for whatever goes sideways. Trust me, something always does.
Without a doubt, the single biggest landmine is underestimating the cost and complexity of fulfillment. So many creators get hyper-focused on the product and the campaign page that they treat shipping and logistics as an "I'll figure it out later" problem. That's a recipe for disaster.
The moment your campaign ends, you’re hit with a tsunami of tasks: collecting thousands of addresses, calculating exact shipping costs to dozens of countries, handling VAT, and physically getting every single package out the door. It’s an overwhelming job that can easily swamp an unprepared project.
This is exactly why a dedicated pledge manager isn't a luxury—it's a necessity for any hardware project. It automates these painful steps, prevents expensive shipping mistakes, and helps you capture a surprising amount of extra revenue through accurate fee collection and add-on sales. Failing to plan for fulfillment from day one is the fastest way to turn a runaway success into a logistical nightmare.
Kickstarter’s built-in surveys are pretty basic. Think of them as simple, one-time forms. They just aren't built to handle the complexities of a 3D printer campaign. A pledge manager like PledgeBox, on the other hand, acts as your post-campaign command center.
The real game-changer is control and flexibility. A pledge manager lets you charge accurate, real-time shipping fees and collect taxes after the campaign funds have cleared—something that's impossible with Kickstarter's native tools. More importantly, it gives you a chance to upsell backers with add-ons, a strategy that frequently boosts a campaign's total funding by 10-20%.
Here’s a good way to think about it: The Kickstarter pledge manager is like Amazon, the big marketplace where you make the sale. But the PledgeBox pledge manager is like Shopify, the powerful backend that gives you total control over order management and fulfillment. Best of all, PledgeBox is free to send the backer survey and only charges 3% of the upsell if there's any. It’s a risk-free way to professionalize your fulfillment and seriously boost your bottom line.
Consistent, honest communication. That's it. Backers are incredibly patient and understanding when it comes to manufacturing delays, but what they can't stand is radio silence. Being left in the dark is what breeds distrust and frustration.
Post regular, meaningful updates—at least once a month is a good rule of thumb. Share behind-the-scenes photos from the factory floor, be upfront about challenges and how you're solving them, and always give updated timelines, even when the news isn't perfect. This approach builds a ton of trust and makes backers feel like they're partners on your journey, transforming them from one-time customers into true brand advocates.
Ready to streamline your next campaign from pre-launch to fulfillment? PledgeBox offers a complete toolkit to help you build your audience, manage backers, and boost your revenue with powerful upsell features.
Discover how PledgeBox can simplify your 3D printing Kickstarter today.
The All-in-One Toolkit to Launch, Manage & Scale Your Kickstarter / Indiegogo Campaign